

Welcome to keto meals and recipes dot com Today, I'll be making a recipe that I found several years ago on the Matthews Friends foundation YouTube channel
The reason I'm making this video is because I just wanted to show you how to make these buns and to explain a bit more about the process which will make your baking more successful Also, before getting started I would like to point out that my macro calculations are slightly different than the posted amounts noted on the Matthews friend's recipe And also I'll provide a link to the original recipe below my description And now I'm going to start my version of these easy keto buns My macronutrient value for these keto buns is 2
1 to one with eight point one grams of total carbs, five point two grams of fiber, resulting in 29 grams of net carbs These buns are very high in fiber, which is often lacking in a keto diet So first, pre-heat your oven to 180 degrees Celsius or 360 degrees Fahrenheit and place the oven rack in the middle position To ensure success in making these buns, please measure the quantities as accurately as you possibly can if you want your buns to have nice soft centers
Now place a fine mesh sieve over a deep mixing bowl Add all the dry ingredients into the sieve Add the almond flour, the psyllium husk, the baking soda, the baking powder and the Lakanto sweetener, which you'll notice I ground to a confectionery state Salt Sifting the almond flour and all the other dry ingredients is a really important step, because as you're sifting you're aerating and separating the clumps which often form with nut flours and alternate ingredients
Also, the sifting will create a much better, less dense texture to your finished buns You may notice that, since the psyllium husk is a bit coarser, you'll have residue remaining in the sieve when you're done, but that's okay Just toss the psyllium granules on top of the sifted ingredients at the very end Now that you've sifted everything, it's important that you stir and whisk the sifted ingredients thoroughly before adding the wet ingredients This will blend the dry ingredients into a homogeneous consistency which, by the way, is very important because it will ensure that the salt, baking soda and baking powder are evenly distributed throughout the almond and psyllium husk mixture
If you don't, you'll find that you'll have pockets where the baking soda or baking powder or the salt are more concentrated, and you'll taste that in your final buns After you've done this, then into your mixing bowl with the dry ingredients add your egg whites and also add the white wine vinegar Then stir to combine Alternatively, you can add the white wine vinegar to your egg whites and stir and then add the mixture to the dry ingredients I have found it really doesn't make any difference which of these two methods you use
The buns come out the same at the end After adding the egg whites and vinegar, you must stir immediately until everything is well combined and all your dry ingredients are moist The next step is to add the boiling water and stir well immediately It is important that your water has just come off a boil and not just a warm water You'll get very different results if you're not using boiling water
Here is a previous example where I used warm water and as you can see the batter is more of a consistency of pancake batter than my bun batter Now stir in the water with the other ingredients until the mixture forms a more solid texture Make sure you scrape the bottom and get all the dry ingredients Set aside for about 20 minutes to allow the almond flour and psyllium husk to absorb all the water In the meanwhile, line a cookie sheet with parchment paper
Before dividing your dough, Knead it one more time Then divide the dough into six even portions or buns When you're shaping your buns, pat them very lightly and place them onto the parchment lined cookie sheet Be careful not to compress the dough as you shape it because, if you press the dough too hard, it will push out the air bubbles formed from the chemical reaction of the baking soda and vinegar, and your buns will not be as soft and light You'll have a much denser center of the bun
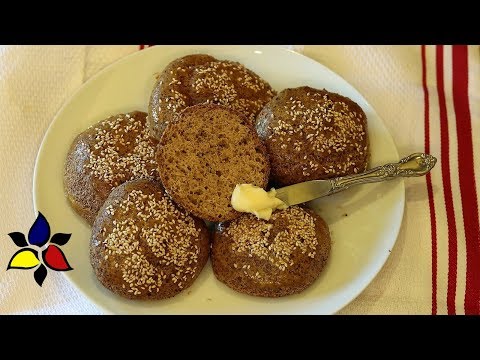
After you've shaped all your buns brush the top and sides of each bun with your egg yolk Then you have an option of sprinkling about 1/4 teaspoon of sesame seed on top of each bun Place the tray of buns into the oven and bake for about 45 minutes Remove the buns from the oven and place on the cooling rack until the buns are completely at room temperature During the cooling process, the internal heat will keep cooking the center and make it nice and fluffy
I place my buns into a tea towel lined basket and cover the buns with the tea towel in this way They'll stay good for two days on the counter, But if I'm making a larger batch or a double batch, I place my buns wrapped in a tea towel into the refrigerator I don't know how long they'll actually last in the refrigerator – I've only had them in the refrigerator for three to four days before they were all eaten Some of the uses for these buns are they make amazing hamburger buns or you can use them as sandwich buns and they make great dinner rolls, especially to be served with stews, pastas and sauces You may be wondering what these buns taste like
Well, they don't taste like white bread They taste more like a multigrain bun and they have a nice firm texture on the outside and a soft center Even though this is not my original recipe and has been modified just slightly, I hope that this explanation will be helpful to you and I hope you enjoy the buns Thank you very much for watching this video and I hope you come back for the next video The link for the printable recipe is provided in the description below
HIGHLY RECOMMENDED


